 |
| Miss Gene Marshall |

This delightful 1950's era lampshade style hat was made from wool felt molded over a found object....in this case, an old vinegar bottle. You can easily make stylish hats for your favorite miniature diva by using simple objects as a hat block.
The first thing you'll need is an appropriate bottle for your hat. You might just find the perfect one in your kitchen or bathroom. If not, check out the beauty and skincare aisle at your local drugstore or even the condiment aisle at the market. Make sure the bottle is long enough to allow for the felt to stretch down, and that it is the same size or smaller than your doll's head. If necessary, you can pad a smaller bottle with muslin or felt to make it larger. The 16 oz. vinegar bottle used in this tutorial measures 4 1/4" around the cap and 6 1/4" around the "brim".
Additional supplies needed:
A good quality wool felt. I used a 9" x 11" piece.
Rubber band
Foil
Saran Wrap
Scissors
Steam iron or steamer
Press cloth
Assorted ribbon and trim
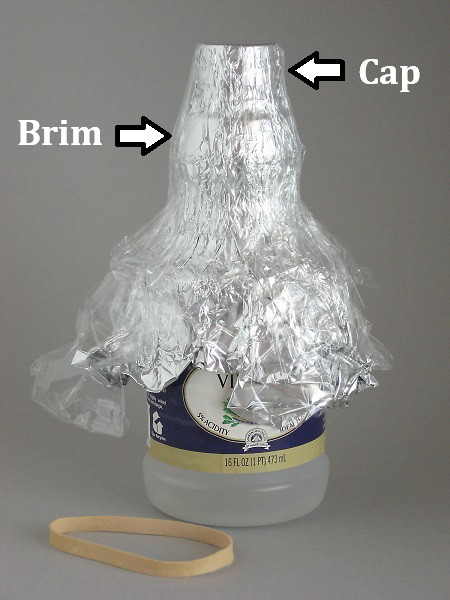
Step 1. Prepare the "hat block" by covering the bottle with foil. Cover the foil with saran wrap.

Step 2: Thoroughly wet felt under the faucet with hot water, stretching the felt in all directions. This will loosen the fibers and make it easier to stretch and smooth. Blot excess moisture with a paper towel. Center the felt over the bottle, smooth down sides and secure with a rubber band. Begin pulling and smoothing excess felt below the rubber band until it is smooth and wrinkle-free above the rubber band. Take your time. Once you are satisfied with the results, let it dry for at least 24-hours. Tip: To make sure the "crown" remained well-defined as it dried, I wrapped a piece of saran wrap firmly around the cap and secured with a small piece of scotch tape as shown above.


Step 4: Determine the desired width of the brim. Turn under the excess amount. This will clean finish the inside of the hat and give support to the brim. Place your hat back on the "hat block". Cover with a press cloth and steam the brim. Let dry thoroughly. You are now ready to trim your new hat.
 |
| Phoenix Gene Marshall wears Smart Set from Ashton Drake. Portfolio from Mattel. |
Here is a simple alternative for finishing the edge of the brim:
Trim the edge with scissors to the desired finished width. You can use dressmaker's chalk or even painter's tape as a cutting guide if needed. I find the hat is easier to mark when left on the "hat block". Soften the cut edge of the felt by lightly sanding with the finer side of an emery board. Click HERE to see a variation of Gene's lampshade style hat using this finishing technique.Resources:
Wool felt is available from Edinburgh Imports, Inc.
The Art of Making Miniature Millinery by Timothy Alberts, Hobby House Press, Inc.


